
Alright, so you’re thinking of building a rocket stove for outdoor cooking? Whether you’re a seasoned DIY enthusiast or just someone who likes tinkering around in the backyard, a rocket stove is an awesome project to take on. It’s efficient, environmentally friendly, and pretty cool to show off when you have guests over for a campfire-style dinner. Plus, it uses just a handful of sticks or twigs to generate enough heat to cook a full meal. Let’s dive into how you can build your own backyard rocket stove without over complicating things.
Table of Contents
What is a Rocket Stove?
Before we jump into the nitty-gritty, let’s talk about what a rocket stove actually is. A rocket stove is a super-efficient cooking stove that’s designed to burn small amounts of wood while producing a lot of heat. The secret? It’s all in the design. Rocket stoves are built to maximize airflow, which creates a hotter and more complete burn than a typical fire pit. You get a lot more heat from much less fuel. Cool, right?
These stoves are perfect for outdoor cooking, camping, and even off-grid living. You can use them to boil water, fry up some bacon, or simmer a pot of stew—all while reducing your carbon footprint.
Why Build a Rocket Stove?
You might be asking yourself, “Why bother building a rocket stove when I can just use my BBQ or stove?” Great question! Here’s why:
- Efficiency: Rocket stoves are incredibly fuel-efficient. You’ll only need a few small twigs or sticks to cook a meal.
- Eco-friendly: Because they burn fuel so efficiently, there’s very little smoke, which means fewer emissions and a smaller environmental impact.
- Cheap or free fuel: No need to buy charcoal or propane. You can just pick up some sticks from your yard or nearby woods.
- Emergency readiness: If you’re ever in a pinch—like during a power outage or camping trip—a rocket stove can keep you cooking without relying on electricity or gas.
- DIY satisfaction: Let’s be honest, building stuff with your own hands is just plain satisfying. Plus, rocket stoves are a great conversation starter.
Materials You’ll Need
Okay, let’s get into what you’ll need to build this bad boy. Don’t worry, nothing on this list is hard to find, and you might even have some of it lying around already. Here’s a basic list:
- Metal or concrete blocks: For the stove’s body. You can use bricks, cinder blocks, or old metal cans—basically anything that can handle heat.
- Insulating material: Vermiculite or perlite works great, but you can also use dirt or ash in a pinch. This keeps the heat where it’s needed.
- Chimney pipe or large metal tube: This will act as the main chamber where the fire burns.
- A small metal grate or mesh: To support your pot or pan while still allowing air to flow through.
- Fireproof mortar or high-temp cement: For binding things together if you’re using bricks or blocks.
- Metal tools: You’ll need some basic tools like a saw, hammer, and perhaps a metal file, depending on your build.
Now, depending on what you have lying around, you can get creative with this. I’ve seen rocket stoves built from old tin cans, steel pipes, and even clay. The key is to have materials that can handle high heat and create a good airflow for the combustion process.
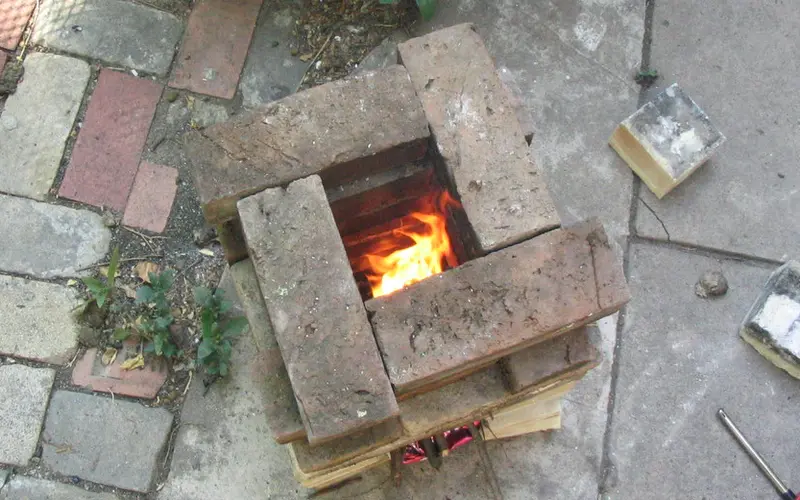
Step-by-Step Guide to Building Your Rocket Stove
Ready to roll up your sleeves? Let’s break this down step by step. Don’t worry if you’re new to DIY projects—this one’s totally beginner-friendly.
1. Start with the Base
First off, you’re going to need a solid base. You want your stove to be stable, especially when you’ve got a pot or pan sitting on top. If you’re using concrete blocks or bricks, lay them out on a flat, fireproof surface in your backyard. Ideally, you want the base to be at least a couple of blocks high so the air can flow into the fire chamber.
Make sure the area you’re working in is safe—clear away any flammable material, and keep a bucket of water nearby just in case.
2. Build the Fire Chamber
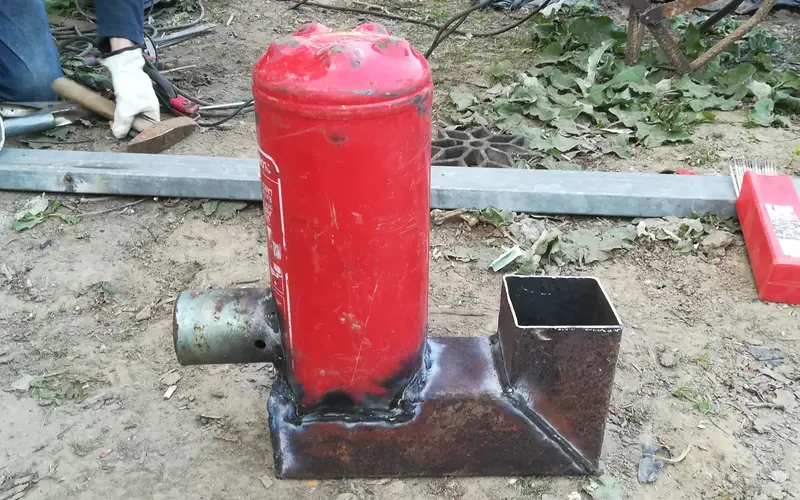
The next step is to create the “L-shaped” burn chamber. This is where the magic happens. The vertical part of the “L” is where the fire burns, and the horizontal part is where you feed the fuel.
- If you’re using metal: Grab a metal tube or pipe and cut it to create an L-shape. The vertical section should be tall enough to generate a good updraft (about 12-18 inches is a good starting point), and the horizontal section should be just long enough to load sticks (around 8-10 inches).
- If you’re using bricks or blocks: Lay them out to form a similar L-shape. Use fireproof mortar or high-temperature cement to bind them together. Make sure there are no gaps where air could leak out.
3. Add Insulation
To make your rocket stove super efficient, you’ll need to insulate it. This helps concentrate the heat in the burn chamber and keeps it from escaping. Fill the space around the fire chamber with vermiculite, perlite, or even just dirt if that’s what you’ve got handy. The idea is to trap the heat so it stays hot enough to burn small pieces of wood quickly and completely.
4. Build the Chimney
The chimney is the vertical section of your stove where the heat and smoke rise up. You want this part to be nice and tall, which will create a good draft and keep the fire burning strong. If you’re using a metal pipe, attach it securely to the burn chamber.
For a brick or block stove, keep stacking until you’ve built the vertical section to around 18 inches. Again, make sure everything is sealed up tight with fireproof mortar.
5. Create the Air Intake
Airflow is key to making your rocket stove efficient. The air intake is basically just the open space at the base of the L where you feed in your sticks and twigs. Make sure it’s wide enough for a steady flow of air but not so wide that you lose heat. Around 3-4 inches should do the trick.
If you want to get fancy, you can create a small adjustable door or flap here to control the airflow.
6. Install a Grate
At the top of the chimney, place a small metal grate or mesh. This is where your cooking pot or pan will sit, but it’s also crucial for allowing air to circulate around the fire. The gaps in the grate ensure that air keeps flowing, which is what makes the rocket stove so efficient.
You can use an old grill grate or even some scrap metal mesh for this.
7. Test It Out
Once your rocket stove is built, it’s time to test it out! Gather a handful of dry sticks or twigs and feed them into the air intake. Light the fire near the base of the chimney and watch as the airflow kicks in and the flames start roaring.
If everything’s working right, you should have a powerful, efficient fire in just a few minutes, and you’ll be able to start cooking right away.
Tips for Using Your Rocket Stove
Now that you’ve built your stove, let’s go over a few tips for getting the most out of it:
- Use dry wood: Wet or green wood won’t burn as efficiently, so make sure you’re using dry sticks and twigs.
- Monitor the fire: Rocket stoves burn fast and hot, so keep an eye on it. You’ll need to add fuel regularly since the chamber is small.
- Experiment with airflow: If your fire isn’t burning as efficiently as you’d like, try adjusting the airflow by adding or removing fuel or tweaking the intake.
- Keep it safe: Always be mindful of safety. Never leave the stove unattended, and keep it on a non-flammable surface.
Building a backyard rocket stove is one of those DIY projects that are fun, practical, and endlessly satisfying. Not only will you have a great little outdoor cooking stove, but you’ll also have the pride of knowing you built it yourself. It’s perfect for off-grid cooking, camping, or even just grilling up some veggies for a weekend BBQ.
The best part? You’re making something that’s efficient and environmentally friendly, and using materials you probably have lying around the house or yard. So, grab those bricks, that metal pipe, or whatever you can find, and start building your own rocket stove today. Trust me, your backyard cooking game is about to reach a whole new level.
Three men on a building site at lunchtime. The first man opens his sandwiches, takes a bite and throws them away. “I hate these sandwiches and they are the same every day”.
The second man opens his sandwiches, takes a bite and throws them away. “Oh no…I hate these sandwiches and they are the same every day”.
The third man doesn’t open his sandwiches, just throws them away and says “I hate these sandwiches too and they are the same every day”.
The first man asks “You didn’t bother to open your sandwiches, how do you know what was in them today before you threw them away?”
“I made them.” replied the third man.