
Mixing Cement, Rendering, and Getting It Right
Mixing cement and concrete isn’t rocket science, but it’s not as straightforward as dumping a few bags into a bucket and hoping for the best. When I first decided to tackle a concrete project, I thought, “How hard can it be? It’s just grey goop, right?” No. Let me walk you through what I learned, from mixing ratios to drying times, and even how I tackled rendering an external wall. By the end, you’ll be armed with all the tips you need to avoid a gooey mess.
Table of Contents
Cement vs. Concrete: What’s the Difference?
Let’s clear this up before we go any further. Cement and concrete are not the same thing. I learned this many years ago after proudly declaring to a neighbour that I was “mixing cement for a base,” only to be corrected with an eye-roll.
- Cement is a fine powder made from limestone and clay, and it acts as the glue in construction projects.
- Concrete is a mixture of cement, sand, gravel (or crushed stone), and water. It’s the end product that gives you a solid slab to park your bike on—or build your garden shed.
Think of cement as flour and concrete as the cake. One’s the ingredient and the other’s the tasty result (minus the taste, of course).
Friendly Tip: If someone catches you “mixing cement” when you mean “concrete,” just smile and nod. You’ll know better by the end of this article.
Mixing Concrete: Ratios and Technique
The key to good concrete is the ratio. After a bit of trial and error (and one particularly crumbly disaster), I found the sweet spot:
- 1 part cement
- 2 parts sand
- 4 parts aggregate (gravel or crushed stone)
- Water (enough to make it workable but not soupy)
I started by dry-mixing the cement, sand, and aggregate in a wheelbarrow. Once everything was evenly blended, I added water a little at a time. Here’s the trick: aim for a consistency that holds its shape when squeezed but isn’t dripping wet. Think of it as making dough—too dry, and it’ll crack; too wet, and it’ll sag.
Pro Tip: Rent a cement mixer for larger projects. Mixing by hand is great for arm workouts, but your biceps will thank you for the machinery.
Drying Times: Patience is Key
Concrete drying times are a bit like baking bread—you can’t rush them. I made the mistake of stepping onto a “dry” patch after just 24 hours, and let’s just say my footprint will be there forever.
- Initial Set: Concrete starts to harden within 24 hours, but it’s still too weak to handle weight.
- Curing Time: For full strength, concrete needs to cure for at least 28 days. Yes, 28 days! During this time, keep it moist by misting it with water or covering it with damp burlap.
Wetting helps prevent cracks and ensures the concrete achieves its maximum strength. I wet my concrete every day for about a week after it’s poured. I know it sounds odd to newbies who are expecting it to dry not get wet, but if you don’t wet it, you will run the risk of it cracking as it dries. It will dry even under water.
Foundations: The Bedrock of Success
Now, let’s talk about laying a foundation. Whether it’s for a patio, a shed, or a pathway, a good foundation is crucial.
Step 1: Prepare the Ground
I dug down about 6 inches to remove topsoil and roots. Then, I added a 2-inch layer of compacted gravel for drainage. Think of this as the mattress under the sheets—without it, everything will sag.
Step 2: Build Formwork
Using wooden boards, I created a frame to hold the wet concrete in place. In some countries it’s known as shuttering. The formwork also made it easier to level the surface. I drove stakes into the ground to keep the boards steady because nothing ruins a good pour like a collapsing frame. Then add the boards on the inside of the stakes so that the concrete doesn’t push the boards off.
Step 3: Pouring and Leveling
Once the concrete was mixed, I poured it into the formwork, spreading it evenly with a shovel. Then came the fun part—levelling it with a screed (a long, straight piece of wood). For extra smoothness, I finished it off with a trowel.
Try to get the stakes and boards all to the same height then you can use a spirit level to get all the boards level so that the concrete can be poured to the top of the boards all round when it will have a nice level surface. You don’t want one side rising at one corner and the other side dropping in the opposite direction.
Strength Matters: Finding the Right Mix
Concrete strength is measured in PSI (pounds per square inch), and it varies depending on what you’re building. For general DIY projects like patios and pathways, 3000 PSI is plenty. For structural projects, aim for 4000 PSI or higher.
The Secret to Strength:
- Use clean, high-quality ingredients. Dirty sand or gravel can weaken the mix.
- Don’t skimp on curing time. Strong concrete is a patient concrete.
Rendering External Walls: A Sticky Situation
After mastering concrete, I moved on to mixing cement to render an external wall. Rendering involves applying a cement-based mixture to a wall to create a smooth or textured finish. It’s both functional (weatherproofing) and decorative. This is a normal finish where I live as most of the houses are very old. Usually more than 150 years and are built with rocks from the local river bed.
Step 1: Prepping the Wall
Before rendering, I cleaned the wall thoroughly and dampened it with a hose. Wetting the wall prevents the render from drying too quickly, which can cause cracks. It also helps the cement to stick to the wall. It’s like hydrating your face before applying moisturizer—essential for a smooth finish.
Step 2: Mixing Cement
I used a mix of:
- 1 part cement
- 4 parts sand
- Waterproofing additive (optional but helpful)
I mixed it to a consistency slightly wetter than peanut butter—spreadable but not runny.
Step 3: Applying the Render
Using a trowel, I applied the render in thin layers, starting at the bottom and working up. For a smooth finish, I used a float (the flat oblong tool with a handle) to even out the surface. For a textured look, I ran a sponge over the render before it dried.
I found that getting a trowel full of cement and carefully but firmly throwing it at the wall in a controlled manner, helped the cement to get in between the rocks for a really good hold. If you don’t get this hold, any rain getting in between the rocks or bricks and the cement will eventually force the cement off the wall in lumps and even large sheets.
Wetting Walls Before Plastering: Why It’s a Must
Drywalls suck the moisture out of the plaster, making it harder to work with and prone to cracking.
Here’s what I did:
- Sprayed the wall with water until it was damp but not dripping.
- Applied the plaster in small sections, working quickly to avoid it drying out.
- I watched someone (who appeared to know what he was doing) just getting the stuff on without bothering to make it properly flat. The next day he added a second coat and this time smoothed it all out. I copied him.
The result? A smooth, crack-free finish that made my look rather professional.
Lessons Learned Along the Way
- Patience Pays Off: Whether it’s curing concrete or rendering walls, rushing leads to regrets.
- Invest in Good Tools: A decent trowel and a sturdy wheelbarrow can make all the difference.
- Don’t Fear Mistakes: I’ve left a few imperfections in my projects, but they’re reminders of lessons learned.
Final Thoughts
Mixing concrete and cement, laying foundations, and rendering walls may seem daunting, but with the right approach (and a bit of humour), it’s entirely doable. My garden now boasts a cemented kayrak area* for my BBQ, and my shed’s floor is smoother than my morning coffee. If I can do it, so can you. Just remember: measure twice, mix once, and don’t forget to wet the walls!
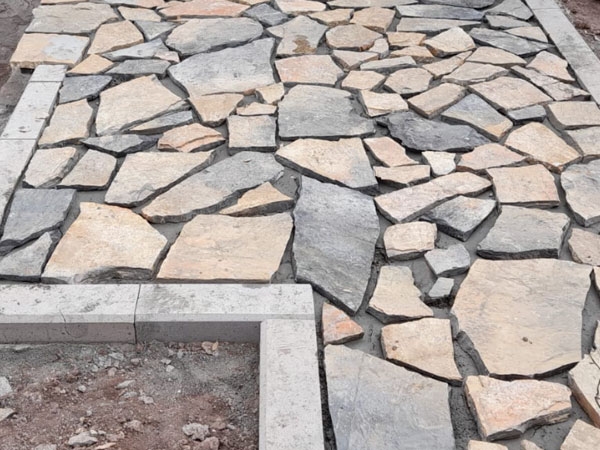
- Kayrak is a Turkish word for large thin pieces of quarried stone laid on the ground or wall with cement and later pointed between them. Pointing is the term used for the cement filling between the stones or bricks.